You will need
- Paper or canvas
- Drawing materials in black and white (pencils, ink, charcoal, paint)
- Mirrors (as big as possible)
You will need

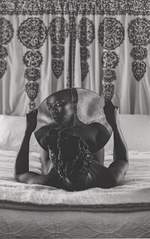
Zanele Muholi, Bona, Charlottesville 2015, photograph, gelatin silver print on paper, 60 × 50.3 cm
© Zanele Muholi, courtesy Tate Photography
Your students don’t need to know anything about an artwork or artist to start exploring it.
Use these quick group activities to build their confidence and curiosity in sharing their first responses to the artwork. Some artworks they might like straight away, some they might not.
Discovering art can be new, exciting and sometimes confusing. There are no right or wrong ways to respond!
In pairs or as a group, take it in turns to imagine the artworks answering these questions and telling their story.
In pairs or as a group, use your body to respond to the artwork.
Bona, Charlottesville 2015 is one of a group of black and white self-portraits taken by artist and activist Zanele Muholi. It is from the ongoing series Somnyama Ngonyama (titled after an isiZulu phrase meaning ‘Hail, the Dark Lioness’), in which Muholi portrays themself in a variety of guises with a range of props and adornments set against different backgrounds. In this image, Muholi is seen looking at their reflection in a large round mirror while reclining on a bed.
Muholi began this series in 2012 while travelling, as a way of marking their presence in different spaces. The series, however, took off in 2014 when Muholi decided to create 365 self-portraits, each responding to different physical environments, histories and personal experiences, as a way to confront the politics of race and representation. The titles are in isiZulu, the artist’s home language, and usually reference the geographical location where they were made.
In each of the Somnyama Ngonyama images, there is a saturated and unapologetic blackness achieved through deliberately toning down any highlights, exaggerating Muholi’s skin tone and penetrating gaze. In doing so, Muholi compels the viewer to engage in dialogue, both with the works and the issues they address.
In their work as a photographer and self-identified ‘visual activist’, Muholi focuses on the experiences of the Black LGBTQIA+ community in South Africa.
Zanele Muholi prompts us to think about identity, community and the politics of race and representation. In this activity, make a self-portrait that presents the viewer with a particular message, demand or feeling.
Adapt
Get inventive with your mirror! If possible, use a large sheet of safe mirror or reflective Perspex.
Try coming together in a circle and slowly passing the mirror from one person to the next until you have all had a turn. If you are feeling ambitious, pass a camera around starting with it opposite the mirror and moving it to keep up with the mirror as it travels.
Look in the mirror. You might see the body of the person holding it and the face or body of another person entirely reflected in it!
Think about the sensation of touch as you hold the mirror; how does it feel to be connected to one another in this group artwork, using yourselves as subjects?
4. Decide on what drawing materials you are going to use. Think about how to develop contrast and shade with the black and white materials to bring more depth to specific parts of your image.
5. Start by roughing out your drawing, including the mirror that you are looking in. This will leave a background space to get to later.
6. Draw your face (and any other part of your reflection).
7. Next look at what else you can see in the reflection. You might see part of the classroom or other students. Decide whether you want to include these details and if there are other things that you wish to bring in to give clues about what is on your mind.
Do you want to convey a feeling just through your expression, or do you want to guide your viewer to a specific reading?
You could even use text in your reflection!
8. Lastly, think about the background. Go back to your ideas of significant places and decide on what you want to use and how this might shape your image. Again, this might be quite subtle or straightforward or you could be adventurous (this could be home, a specific room, even an imagined space).
9. Look at your artwork. You have made a self-portrait bringing 3 separate elements together!
10. At the end of your lesson, bring all of your self-portraits to the front of your classroom and look at them together. Find each other’s messages and celebrate the artwork you’ve just made!
What have you learned by using your body as a subject to represent something you feel passionate about?Â
Extend
Make a self-portrait every day for a week.
How does this practice and its results change over time?
What happens as your environment changes around you?
How might you bring together seven images to make a powerful message?
Do you believe art can change the world?
Then, try making a self-portrait every day for a month – or even a year!
Making art is a powerful way to learn new skills, explore ideas and express ourselves creatively. Encourage your students to discover new materials, techniques and methods inspired by great artists at Tate.
2. Explore (10 minutes)
3. Make (30 minutes)